Do you know that you can interact with Maps charts in Data Studio or Looker Studio just like in Google Maps app? Actually.. we can do more than that!
In my previous article, we’ve discussed on the fundamentals about Bubble Map in Google Data Studio and some hands-on tutorial on how to add them into your reports.
In this article, we’ll discuss these 3 topics below:-
- Zoom Area feature in Google Maps charts in Data Studio/Looker Studio
- Zoom Area Limitations
- 2 Common Examples and Hands on Tutorial, which explains how we as a report developer, can help to overcome this and make our reports more user-friendly!
How To Zoom In Google Maps Chart ?
Both types of Google Maps Chart in Data (Looker) Studio has the zoom area feature to allow users to interact with the map easily.
To zoom in to specific area, you could tap on the + sign on the map, located on the buttom right of the map visual. Alternatively, you could double click on the map to zoom in closer to specific map area.
Notice that when you zoom in further, you’ll be able to see more granular location marks.

Limitation of Zoom Area Settings
However, in some cases you may want to enable user to zoom in to specific country or city with just one click. Let me explain further with the example below.
Geo Charts vs Google Maps
GDS / Looker Studio Google Maps zooming settings is quite limited, if we compare to Geo Charts. Geo Charts comes with Zoom Area setting, which specifies how much of the area the map displays. This means report editor is able to restrict the map to selected area, defining by the scope of the geo field used, and editor’s choice.
Whereas in Google Maps Charts, the default zoom area is determined by the range of your geo data in the entire datasets. For instance, if the entire datasets only consists of geo coordinates within Klang Valley area, the map would automatically zoom in without any configuration required.
However, when we have larger range of data that involves world-wide geographical data, it can take awhile to zoom to a city level, for instance: London in United Kingdom.
Good news is…
We have solution for this!
Note: Location Data for Filter doesn’t need to be in Geo data type.
Dataset
For illustration purpose, I’m using location data of my favourite restaurants and all their branches in Malaysia.
This dataset comprises of the following field and data type:
-
Branch, a String field which represents the city of the restaurant locates, and -
Location Geo Point, a Geo field for geo-coordinates of the restaurant.
Full Guide on Zooming a Google Map Charts
Here’s a video tutorial if you wish to learn from video.
Example 1
Let say I travel to Subang Jaya and I want to have some nice food there in my selected restaurants outlets, I can click on this filter Branch = Subang Jaya, then the map would automatically zoom in to the region.

Basically, when user selects a value from the dropdown filter, the map would automatically zoom in to the region, as demonstrated in the GIF below.
This helps to improve user experience with the Google Map charts; They no longer needs to pan around or click on the map to see more granular location data.
As long as you have a higher level of location data, such as city or country in your dataset, we can use
filter controlto enable selective region control in Google Map charts.
Quick Tutorial for Example 1
To build this, follow 2 simple steps below:

Step 1:
- Click
Add a Control. - Select
Drop-down list. - Click on blank canvas to add the filter.
Step 2:
- Drag-and-drop city location field to
Control Field. I’ll useBranchfield in my sample dataset.
Example 2
In Example 1, we allow users to zoom in and out of the map using a simple filter control.
But there are some cases where we want to limit to specific region without allowing users to have visibility or control over.
In this case, you could add the filter in the chart directly, as shown below. Alternatively, you could add the filter to the chart, specific report page or entire report, depending on the business requirements.
Quick Tutorial for Example 2
Just for illustration purpose, we are going to limit the view of the dashboard to exclude Penang outlets.
Step 1: Add a filter condition
- Navigate to
Resource>Manage Filters. - SelectAdd a Filter. - Configure the rules to filter Penang Outlets. Name the filter as
Exclude Penang Outletfor future reference. - Click
Done.

Step 2: Add filter to chart
- Click the Google Map Chart.
- Under Property Panel
FilterSection, clickAdd a Filterand selectExclude Penang OutletFilter to apply the filter to the map chart.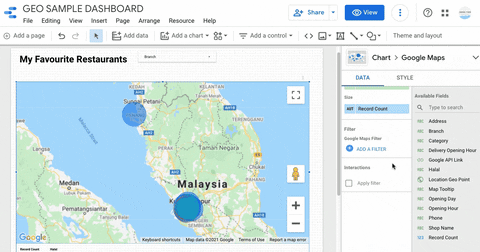
Control Map Zoom Area using Filter in Data Studio
You should observed that the map has been automatically zoom in to Klang Valley region after applying the filter. Viewers would not see any Penang outlet’s data from the map.
Key Takeaway
It takes just a few additional simple steps to make the most out of Google Maps charts in Data Studio / Looker Studio.
If you enjoy the article, please share with me your outcome via instagram or twitter.
